Initial Wired Beans test Summary
I have been testing the “Wired Beans” carts for a little while now. I have broken this summary into two parts – for those who use a cart once (until the printer sends a message that the ink tank is empty) and then throw it away, and for those who refill.
For reference, I did a “vacuum evacuate” procedure on the new carts and then “vacuum refilled” them with my bulk ink so that there was no air in the sponges at the start of the test. For this reason, no comments can be made about the color quality of the inks – I was only interested in the ability of these carts to be refilled.
When an ink chamber subsequently emptied (using the “don’t touch until the printer says that it’s empty” operating mode), the ink chamber was refilled in the normal manner before the cart was reinstalled. The refill procedure was modified in that 4-5 drops of rubbing alcohol were dropped into the filter before refilling, and the alcohol was blown out with some ink after the refill was completed. Click here and scroll down to post #6 for a more detailed explanation on why this was done. A second difference from normal operation was that a full cart with the same ink was installed to keep the print head pickup wet only while the test cart was refilled, then the freshly refilled cart was immediately re-installed.
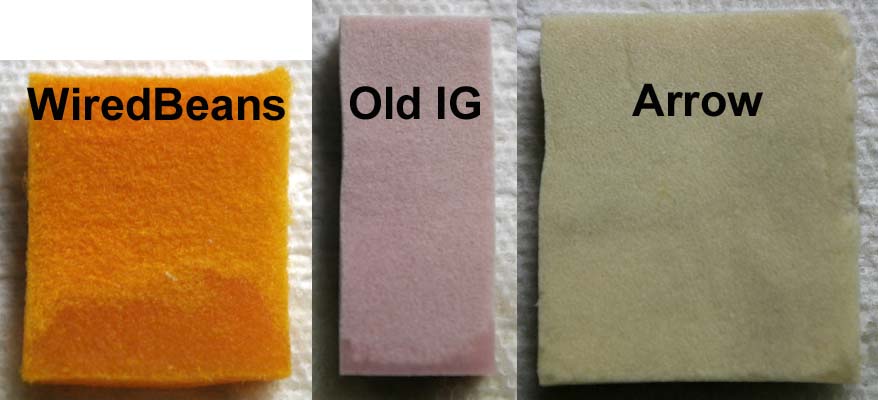
The sponge in the WiredBeans cart is made from a closed cell foam that is slightly easier to blow air through than the other sponges. When it dried, it became very hard, unlike the pother sponges (which remained flexible). It is also VERY much more absorbent than the other sponges. This is a composite image showing a WiredBeans, an “old” InkGrabber and an Arrow sponge after an edge of each totally dry sponge was immersed into 1/8″ of water for 15 seconds and then removed. The WiredBeans sponge clearly absorbed the most water, with the old IG a distant second and the Arrow an even more distant third.

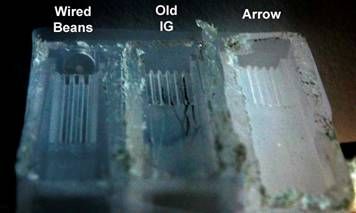
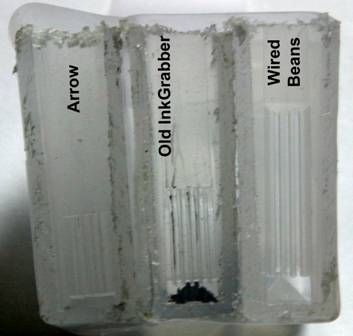
These two images show two views of the details of the vertical wall between the sponge and ink chambers on the same 3 carts. The view on the second image is from the sponge side of the vertical wall between the sponge and ink chambers, and shows the hole at the bottom that allows air to enter the ink chamber and ink to refill the sponge. The view on the first image was taken from the top and at a steep angle to the wall to show some more of the groove detail – the WiredBeans carts have very much taller and deeper grooves than either of the other carts. The design of these grooves helps to explain the differences in how these carts empty the sponge and ink chambers compared to other carts.


Here is an interesting document that claims that inks made in the USA have different viscosities than inks made in other countries. If this is true, it is very likely that carts that work well with US ink may not work as well with other inks, so keep this in mind when reading my conclusions.
Single use summary:
- Pros:
- The larger ink chamber provides more ink in that chamber.
- Cons:
- Due to the groove design, the ink level in the sponge chamber doesn’t drop very much until after the ink chamber is completely empty. Other carts tend to use the ink in the top half of the sponge chamber before the ink in the ink chamber begins to drop. If you switch carts when the ink chamber is empty, almost all of theink in the WiredBeans sponge chamber will be wasted.
- Summary:
- If you change carts when the printer sounds its “Low Ink” warning, there appears to be very little difference in the usable ink capacity with these carts. If you run the printer until the sponge is empty, there is still very little difference in the ink capacity, but you run the risk of clogging the print head any time that you run out of ink, regardless of the cart design.
- I did not see a big “dripping” problem with new carts.
Refilling Summary:
- Pros:
- The sponge readily absorbs ink (see above). In fact, if the cart is tipped with the fill hole higher than the vent hole while the cart is being refilled, ink will sometimes flow out of the vent hole.
- The sponge’s absorbent characteristics appear to allow the cart to remain in the printer until the ink chamber is completely empty instead of requiring it to be refilled when the ink level drops to 1/2″. Combined with the larger ink chamber, this should approximately double the amount of ink that can be used between refills. This was true in a very short test, but it needs to thoroughly tested by others before making a conclusive statement.
- Due to the groove design, the sponge remains “wet” much further up than with other carts, preventing the dye from drying out and forming “thick dye goo”in the bottom of the spongeand workingits way down into the filter.
- Cons:
- As was previously reported by others, these carts drip when the exit port is uncovered after refilling. A lot of this dripping is because the space between the filter and the exit fills with ink during refilling, and this ink is released when the exit is uncovered. All-in-all, this wasn’t a problem as long as it is expected and the exit is uncovered over some paper towels.
- If the exit port isn’t well sealed during refilling, ink drips from the exit port more rapidly than with other carts.
- The paper cover on the top of the carts disintegrates when it gets wet. I like to wash the carts under the tap after the carts are filled and sealed to remove any surface ink, and the paper was easily rubbed off. Paper fibersaren’ta goodthing if they get into the exit port. You also need to somehow mark the ink color in each cart, as you can’t rely on the color or printing on the top cover.
- The tape that covers the vent port is not firmly fastened to the carts – I pulled a few of these tapes off when pulling duct tape from the vents (used to seal the vent during the initial vacuum evacuation/refilling cycle).
- As an apparent cost reduction, there is no exit port cap supplied with the carts – just a single piece of tape that covers both the exit and vent ports. Without a cap to cover the exit port, I had to fashion a cover for the exit port from duct tape for each refill. Be sure to bring one end of the tape well up onto the side of the cart so that when you remove it your fingers are well away from the exit port – otherwise you will get ink on your fingers. You might also want to consider buying some “clips” for these carts – click here for a source for these clips.
- Summary:
- There are some minor annoyances with these carts, but (at least at this time) it appears that they have someadvantages for those who refill their carts, especially the ability to provide twice as much ink between refills as other carts.
- This was not tested, but it is almost certain that these carts will suffer from the same “filter clogging” problem as other carts, so it is important to keep the filters cleaned, as noted above.
Overall Summary:
- After 6 individual refills, all carts preformed without incident (as good as it gets).
- There is more “dripping ink” when refilling carts, but it isn’t a problem once you expect it and learn to deal with it.
- The qualities of the inks supplied with the carts were not tested.
4/27/05 Update:
I had a problem with one of the WiredBeans carts not sealing properly on the rubber seal around the ink pickup on the print head. It seems that the position of the bottom tab on the front of the carts is positioned a little higher relative to the bottom of the exit port than the tab on the OEM carts (this tab locks into the print head to hold the cart down against the rubber seal). I could get it to seal by wiggling the cart until it contacted the seal, but it is something that you have to check each time that you change carts (unlike the other carts, which always give a good seal).
The top tab on the front of the carts is also missing on these carts. I am not sure exactly what this tab does or if it is somehow involved in the problem, but I suspect that it helps to align the cart when it is inserted, but that it doesn’t do anything once the cart is installed.